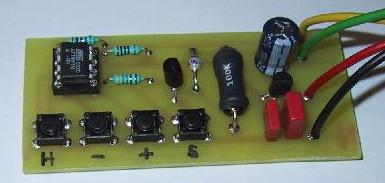
Gauge Corrector


The problem

 As a DeTomaso Pantera owner, I'm "blessed" with italian Veglia gauges, connected to american Ford senders. Neither of which are particulary high quality.

To solve the problem with inaccurate readings, extremely dark illumination, glass fogging, I decided to replace all of the small gauges with higher quality VDO gauges and senders. The only problem with this is the fuel tank sender, which is seriously hard to replace with one that would work properly with the VDO gauge.

I found a document that said that the sender has a resistance of 0Ω when full and 200Ω when empty.

VDO has some special US tank gauges which are 33Ω full and 240Ω empty, and I ordered such a gauge from Summit Racing. I figured that adding a 33Ω resistor in series would work out nicely for both full and empty, and hopefully also for intermediate levels. Unfortunately the 200Ω at empty proved to be around 300Ω in reality, so the choices I had was to add the resistor and have it accurate at full tank, but be off scale when empty, or skip the resistor and have it indicate above full when full, and below empty when empty. Initially I opted for the latter choice.

The solution

I have created a little gadget, based on a tiny single chip microprocessor, that will read the value from the sender, look it up in a user programmable table, and drive the gauge to the desired reading.

As far as I know it will work with most 12V negative ground automotive gauges, using resistive senders that works by being resistive to ground. That includes tank level, various temperature gauges, various pressure gauges.

It allows up to 16 key/value pairs to be programmed and it will interpolate any intermediate values.

It also has an integration mode that will smooth and slow down fast moving gauges.

There are several unique features with this solution:

Calibrating your gauge

As the Gauge Calibrator interpolates between data points, it is very important that the values at the extreme ends of the scale are correctly set.

There are gauges and senders where the resistance decrases with increasing value, and others have increasing resistance with increasing value. It is particularly important to set the extreme values if you are using a sender of increasing type with a gauge of decreasing type, and vice versa.

The first step is therefore to determine what type of sender you have.

Normally temperature senders have decreasing resistance with increasing temperature.

Pressure senders come in both varieties, VDO pressure senders have increasing resistance with increasing pressure, while the Veglia oil pressure gauge used in the Pantera have decreasing resistance with increasing pressure.

The same goes for tank senders, most VDO senders have increasing resistance with increasing fuel level, and the Veglia tank sender in the Pantera has decreasing resistance with increasing level.

Connecting the Gauge Corrector

The Gauge Corrector is shipped with spade connectors on all leads.

Connect the black wire to the gauge ground input.

Connect the red wire to the gauge +12V input.

Disconnect the sender/sensor wire from the gauge and connect the green wire
to the gauge's sender input.

Connect the yellow wire to the sender/sensor wire.

Make sure all connections are correct before applying power.

The maximum sink capability of the corrector is about 0.5A.

Calibrating the Gauge Corrector & gauge

If the corrector has not been shipped with a proper calibration, or
the application has changed, the correctors memory should first be
cleared. This is done by holding the Store button depressed while
applying power. All calibration data is then irretrievably lost, and
the corrector must be reprogrammed by the user.

The first steps are to adjust the corrector to show the correct result
with the sender lead open (unconnected) and shorted to ground. The
order of these two steps is not important.

After this, the correct value at maximum and minimum scale should be
adjusted. Notice that some of these may be the same as one or both of
the first step.

After this, I recommend that the values for 1/8 and 7/8 of the scale
is checked and programmed. This will make the initial linearity much
better and reduce the numer of required additional data points.

The adjustment is then stepwise refined until the gauge is correct
over the entire scale.

Adjusting one data point is done in the following sequence:
  1. Set the correct input value, either using a sender with a known quantity, or using resistors with the nominal resistance.
  2. Press and hold the "Hold" button.
  3. Adjust the gauge reading using the "+" and "-" buttons. Notice that the gauge may move in the opposite direction, depending on the gauge type. Wait a few seconds after obtaining the correct reading to allow the gauge reading to stabilize. Tapping the gauge slightly may be a good idea.
  4. When the correct reading is obtained, press the "Store" button.
  5. Release the "Hold" button. The gauge should now hold the set value as long as the sender value is kept constant.
If the "Hold" button is released before the new value has been stored, the new setting is lost and has to be repeated.

The gauge will likely be at either max or min scale when the corrector is first connected and powered up. Depending on the gauge it may take a long time (~30 seconds) holding the + or - buttons down before the gauge starts to move. The value wraps around, so after the corrector has reached its max value, it will drop down to the minimum value, and the gauge needle should move over the scale. It also wraps going in the other direction.

Notice that it is not possible to remove a single data point, and it is almost impossible to select exactly the same input value again to redefine the value, so if there has been an error in the input, it is best to clear the EEPROM and start over.

There is space in the EEPROM for up to 16 data points, which should normally be more than adequate.

Integration mode

The Gauge Corrector has an optional integration mode, which will slow down fast moving gauges. This is perhaps most useful for tank gauges where the gauge moves around due to fuel sloshing in the tank.

The integration mode is enabled or disabled by pressing and holding the Hold (H) button while switching on the ignition.

Obtaining the Gauge Corrector

This is just a hobby project of mine, and I have created a few for friends and needing car nuts, including one owner of an old Ford that had a broken sender, but a new OEM type sender was impossible to get. He used the Gauge Corrector to connect his new style sender to the original gauge in the car.

The boards were a bit expensive, and I have set a price at US $60 for the board, plus US $5 for shipping to most of the world.

If you're interested in the Gauge Corrector, please drop me an email to thomas@hax.se for availability and payment options.


If you have comments or suggestions, email me at thomas@Hax.SE

Last update: 2005-07-22